The idea for experimenting with Analog to digital conversion came from an old Atari game – Grand Prix.

The game was played with an analogue controller where you could twist the controller clockwise or anti-clockwise to guide the car through the race track. The car’s position is relative to where the controller is positioned which means that you could move very fast. (as fast as you could twist your hand) and with great accuracy.
So having said that, you may or may not have seen the LED car game that I made called The Great Race in order to move your car left and right across the screen, you are required to push either the left or right push button. I wanted to improve the controls and as such I thought that I’d have a go at using the atari paddle controller.
I will be using a pic16f648a microcontroller throughout the explanations – the interesting thing is, the 648a doesn’t actually have any ADC connections. with a bit of searching the internet, I found that you can use any digital I/O pin with just a couple of external components and some very simple code.
Circuit explanation and schematic
We are connecting PORTB to eight LED’s (one LED for each pin in PORTB) These LED’s will help us in ‘calibrating’ the Analog to Digital converter. We are using PORTA pin 0 as the analog input pin. The great thing about this circuit is that you only need four extra components to get the thing working! these being a capacitor (100nF) a resistor (150 ohm) and a variable resistor (10 ohm) in series with a 1k resistor.

Here is my 10 Ohm variable resistor, installed inside of an atari paddle controller:

How it works
Initially we set PORTA pin 0 as an output and we will always be sending a logic 1 to the pin whenever it is set to an output. So this means that we have +5v on PORTA pin 0 which will charge the capacitor to +5v (the 150 ohm resistor is there to limit the charging current – but still allowing the capacitor to charge quite fast.
Then we set PORTA pin 0 to an input (effectively removing the +5v that was there to charge the capacitor) as soon as we set PORTA pin 0 to an input, we check if there is a logic 0 there or not. (of course straight away there will be a logic 1 because the capactitor has had NO time to discharge.) So therefor since we are not at a logic 0, we increment the counter by one, then we again check to see if is a logic 0 yet. If not we increment the counter by one more.
We keep in this loop until the capacitor has discharged which will give us that logic 0 we were looking for. Now that we have this logic 0, we stop incrementing the counter.
The time it takes the capacitor to discharge is determined by the 10 ohm variable resistor and the 1k resistor. The greater the resistance – the less current we will have and therefor the slower the discharge. This means we will end up with a greater number in our counter variable. (i should mention that the 1k resistor is there to prevent the 10 ohm resistor from ever getting to 0 ohms)
So therefor, the number stored in the counter variable is relative to the position of the variable resistor. to give us a visual indication of what is going on, we output the counter variable straight to PORTB for display on the LED’s. Now this is where you can do your calibration.
Calibration procedure
First of all you need to open the calibration sourcecode. (Download at the bottom of this page).
Now you need to build the circuit, compile the sourcecode and copy it to your microcontroller. Then turn your variable resistor fully clock-wise. You will have a certain binary number displayed on the LED’s (for me it was 00001010 – this means that when my variable resistor is fully clockwise, I get the decimal number 10. You need to record your number on some paper.
Now turn your variable resistor fully counter-clockwise. You will get a new binary number (and you will notice that as you turn your variable resistor, the LED’s will count up.)(for me, the number displayed was 01110101 – which equals the decimal number 117)
So now that we have recorded those two figures, we can figure out how many unique ‘steps’ we have in the ADC circuit. in this case it is 109 unique steps (including the extremes 10 and 117) You are probably aware that with an 8-bit variable, we can store one number out of a possible 256 combinations. In this circuit, we are only using approx half the potential of the variable.
If you wanted to be able to get somewhere close to the 256 combinations, then you should try swapping the 10 ohm resistor for a larger one, perhaps 20 ohm or 50 ohm? I am not to sure as i don’t have one to try it. (but for my application, 109 combinations is more than enough! (I only need eight…)
Example program
Well, now that you have figured out what your min and max figures are, you might like to try this next piece of sourcecode which will show you one possible application for this simple ADC circuit.
(download at the bottom of this page).
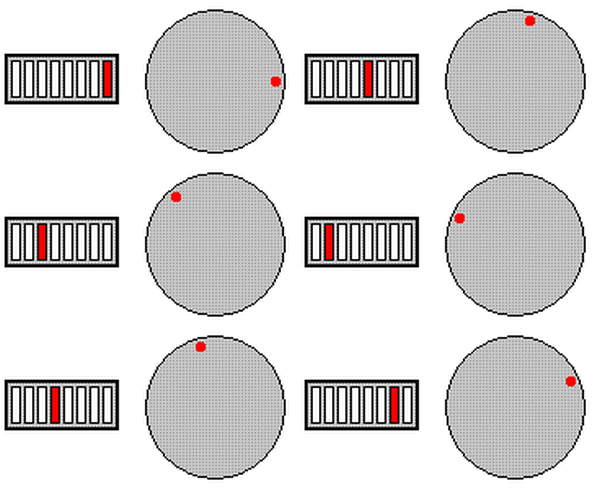
In a nutshell, this new code will light up one of eight LED’s connected to PORTB. This will be relative to the position of the variable resistor.
The animation shows you what the program does.

What it does
The animation to the right demonstrates what this example program is designed to do.
When the potentiometer is fully clockwise, the right most LED is lit. As you rotate the potentiometer counter-clockwise, the LED will shift to the left. Now remember how we figured out that between the two extremes of the potentiometer, there were approx 109 different counts? But in this circuit I only need 8 different positions NOT 109!
So to achive this task I have used the SUBLW instruction to determine if the digital counter is above a certain number.
Let’s break it down: 109 / 8 = 13.625 (lets round it to 14)
So we want to space our eight different LED positions – 14 counts apart.
if the count is between 104 – 118 we want the left most led on.
if the count is between 89 – 103 we want the second most left led on.
if the count is between 74 – 88 we want the third most left led on.
if the count is between 59 – 73 we want the fourth most left led on.
if the count is between 44 – 58 we want the fifth most left led on.
if the count is between 29 – 43 we want the sixth most left led on.
if the count is between 14 – 28 we want the seventh most left led on.
if the count is between 0 – 13 we want the eighth most left led on
To do this we start from the top. here is a snipit of code:
movf digital_count, w
sublw d'104'
btfss STATUS, C
goto load_a
So, we copy the digital count into w. Now that it is in w, we want to subtract the decimal number 104 from it. we dont care about the exact answer, we just want to see if the digital counter is bigger than 104. If the counter IS greater than 104 then we want to turn on theleft most LED so we goto load_a routine which will take care of doing that.
BUT
If the digital counter is less than 104, we then need to compare it with a smaller number until we find out exactly which LED we want to light up.
And that is what I will be doing with the great race car game. you will be able to move the car much faster and with greater accuracy. So i will see how that goes.
You can download the calibration and example program source code here:
![[Brads Electronic Projects]](https://bradsprojects.com/wp-content/uploads/2017/06/BPLogo1-240x58.png)


