Most of my electronic projects revolve around making games. (Retro type video games that you may have seen in the 1980’s). So therefor I need some way of controlling the games – normally by way of push buttons.
I used to connect up some push buttons to a breadboard but it wasn’t the nicest solution. I then thought ‘Hmm, I have a big collection of retro video games, maybe I could use a pre-existing control pad!’
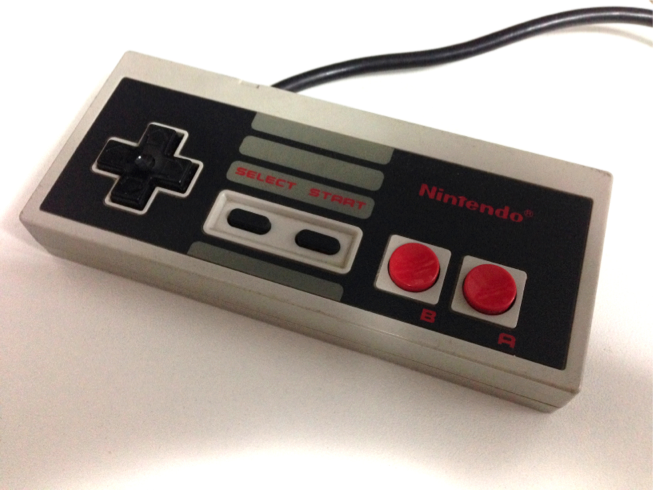
And that’s what I did, I now use a Nintendo Entertainment System (NES) control pad for alot of my projects and it only requires 3 of your digital pins on your Arduino!
If you don’t have one, you can buy these on ebay or perhaps you might find them at garage sales, flea markets etc…
How it works:
The NES control pad contains eight buttons which each have a pull-up resistor. I.E. if you are not pressing the button, it will give you a logic 1. these eight buttons connect to a 4021 chip which is an eight bit parallel to serial shift register. When the NES wants to know the status us the buttons on the control pad, it will first send out a pulse on the LATCH connection. This will cause the 4021 chip in the control pad to store the condition of all eight buttons within it’s eight bit memory. The NES will then send out a series of clock pulses to serially send the data through to the NES. The incoming data is on the DATA line. Once all eight bits are in, the NES can then use this info to move characters etc… on the screen.
Connecting it up to the Arduino:
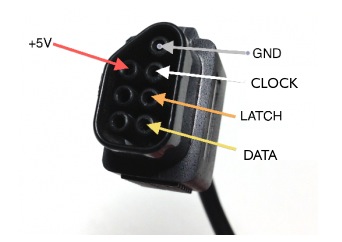
There are actually seven connections on the NES control pad however we are only interested in five of them. Here is a pinout diagram I made. (thanks to http://danplows.com/blog/hack-a-nintendo-nes-controller/ for the pinout details). PLEASE NOTE: This pinout is correct as of 21 August 2013. Previous to this date I had the DATA and CLOCK connections back to front.
You will need to connect five wires to the control pad connector (as shown above) you then connect these to your arduino. Here’s how I did it:
NES ARDUINO
+5v +5v
GND GND
DATA Digital 9
Clock Digital 12
Latch Digital 11
The Main Code:
This code is all you need to read the status of the buttons and store the data:
byte NESData = 9;		// this is the pin that the Data connection is connected to
byte NESLatch = 11;			// this is the pin that the Latch (otherwise known as strobe) connection is connected to
byte NESClock = 12;			// this is the pin that the Clock connection is connected to
byte NESButtonData;			// This is where we will store the received data that comes from the NES Control Pad

void GetNESControllerData(){			// this is where it all happens as far as grabbing the NES control pad data
	digitalWrite(NESLatch, HIGH);		// we need to send a clock pulse to the latch (strobe connection)...
	digitalWrite(NESLatch, LOW);		// this will cause the status of all eight buttons to get saved within the 4021 chip in the NES control pad.
	for(int x=0; x<=7; x++){			// Now we need to transmit the eight bits of data serially from the NES control pad to the Arduino
		bitWrite(NESButtonData,x,digitalRead(NESData)); // one by one, we will read from the NESData line and store each bit in the NESButtonData variable.
		digitalWrite(NESClock, HIGH);					// once each bit is saved, we send a clock pulse to the NES clock connection...
		digitalWrite(NESClock, LOW);					// this will now shift all bits in the 4021 chip in the NES control pad, so we can read the next bit.
	}
}
However I have some more code so that you can see the output:
Test Code:
This code scans the NES control pad in a constant loop and outputs the status of each of the eight buttons to the serial terminal. (There is also a download for this code at the bottom of this page).
// Arduino NES Controller Test Software.

byte NESData = 9;		// this is the pin that the Data connection is connected to
byte NESLatch = 11;			// this is the pin that the Latch (otherwise known as strobe) connection is connected to
byte NESClock = 12;			// this is the pin that the Clock connection is connected to
byte NESButtonData;			// This is where we will store the received data that comes from the NES Control Pad

void setup() {				// let's get a few things setup before we get into the main code
	Serial.begin(9600);			// serial data will be sent at 9600bps
	pinMode(NESLatch, OUTPUT);	// Latch connection is an output
	pinMode(NESClock, OUTPUT);	// Clock connection is an output
	pinMode(NESData, INPUT);	// Data connection is an Input (because we need to receive the data from the control pad)
}

void loop() {						// we will run this code in a constant loop until power is removed
	GetNESControllerData();			// This calls the function to grab the NES control pad data and it will store it in 'NESButtonData'
	Serial.println("RLDUSSBA");		// the first line prints a letter to correspond with each button
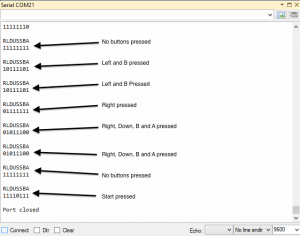
	print_binary(NESButtonData,8);	// the second line will print eight binary digits that tells us the status of each button (a 1 means not pressed and a 0 means pressed)
	Serial.println("");				// print a line to space things out
	Serial.println("");				// print another line to space things out even more
	delay(500);
}

void GetNESControllerData(){			// this is where it all happens as far as grabbing the NES control pad data
	digitalWrite(NESLatch, HIGH);		// we need to send a clock pulse to the latch (strobe connection)...
	digitalWrite(NESLatch, LOW);		// this will cause the status of all eight buttons to get saved within the 4021 chip in the NES control pad.
	for(int x=0; x<=7; x++){			// Now we need to transmit the eight bits of data serially from the NES control pad to the Arduino
		bitWrite(NESButtonData,x,digitalRead(NESData)); // one by one, we will read from the NESData line and store each bit in the NESButtonData variable.
		digitalWrite(NESClock, HIGH);					// once each bit is saved, we send a clock pulse to the NES clock connection...
		digitalWrite(NESClock, LOW);					// this will now shift all bits in the 4021 chip in the NES control pad, so we can read the next bit.
	}
}

// this code allows us to specify the number of binary digits we want (which is always 8)
// The code has been made available from: http://www.phanderson.com/arduino/arduino_display.html
void print_binary(int v, int num_places){
	int mask = 0, n;

	for (n=1; n<=num_places; n++){
		mask = (mask << 1) | 0x0001;
	}
	v = v & mask;  // truncate v to specified number of places
	while(num_places){
		if (v & (0x0001 << num_places-1)){
			Serial.print("1");
		}
		else{
			Serial.print("0");
		}
	num_places--;
	}
}
So when you upload the code and then open up the serial terminal, your output will be something like this:
You can then use this code for all sorts of things, maybe even a NES control pad to USB converter to use with a NES emulator?
![[Brads Electronic Projects]](https://bradsprojects.com/wp-content/uploads/2017/06/BPLogo1-240x58.png)


[…] in the picture to see the data created when each button is pressed or try running this sketch from bradsprojects.com– and the Arduino captures the pulses and interprets them by looking for the 0s in each […]
[…] picture to see the data created when each button is pressed or try running this sketch from bradsprojects.com– and the Arduino captures the pulses and interprets them by looking for the 0s in each […]
This is really neat! works like a charm. you got any code to send data back to the nes like sending 11111110 back so the player would jump?
Thanks for the heads up Rohit – I accidentally declared the NESData pin as NESSerialData. I have now fixed the download and also the code here in this page.
won’t compile,
variable ‘NESData’ not defined.