soldering SOJ (& similar) parts without special equipment
Posted: Tue Dec 06, 2016 7:31 am
Since I just wrote this up elsewhere, I figured it'd be good to recycle while it's on my mind.
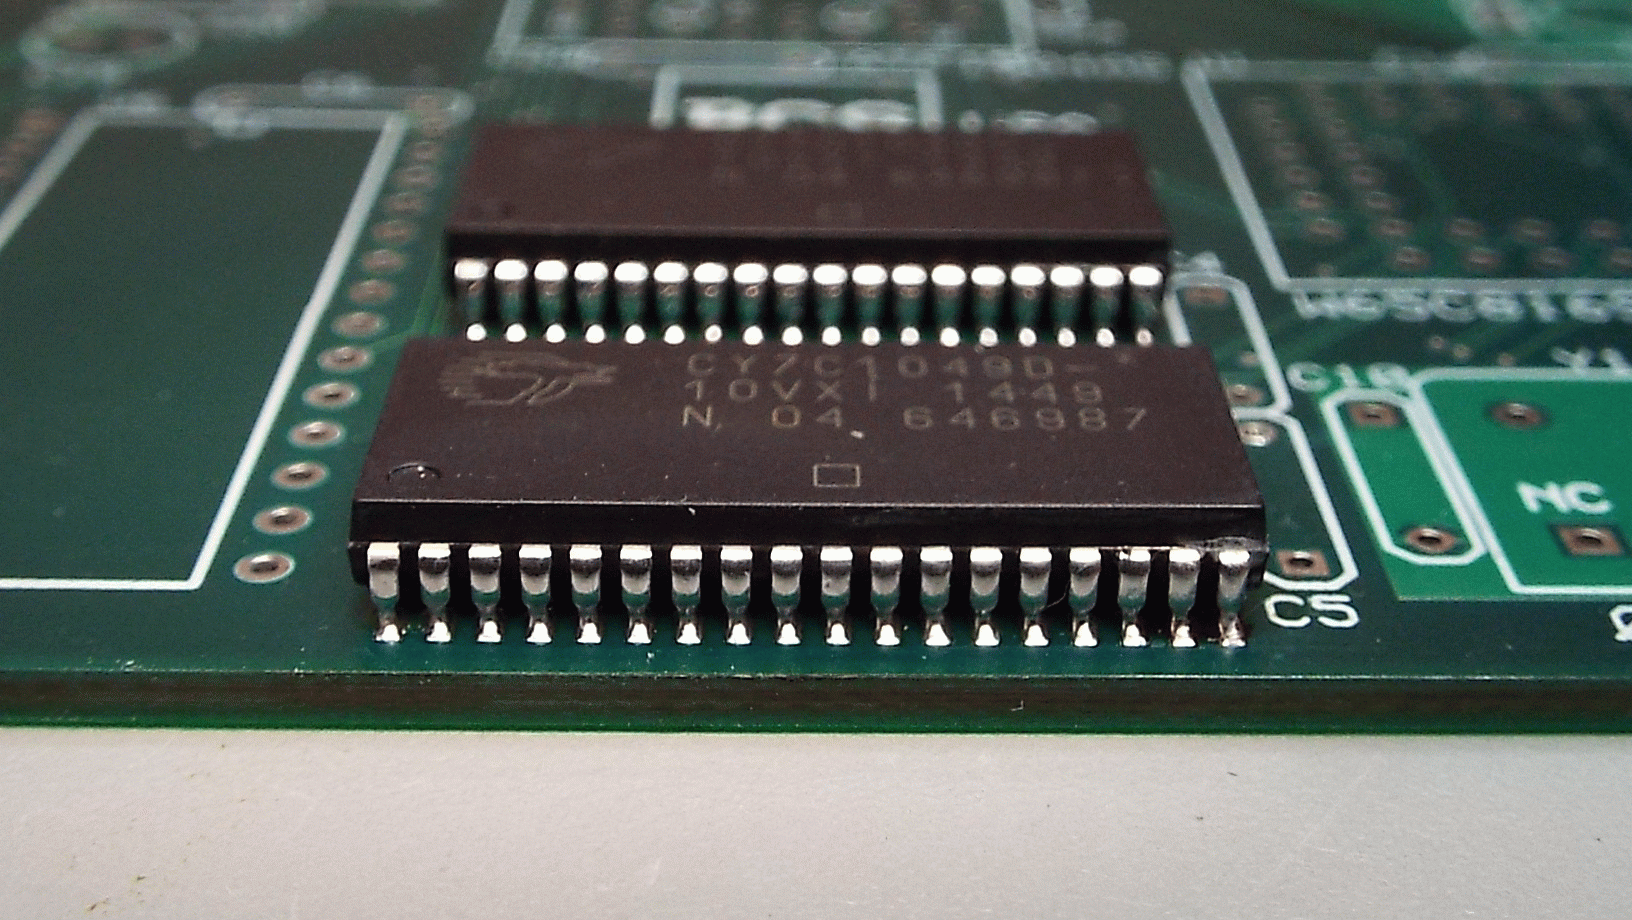
A prominent member on that forum, "BigDumbDinosaur," has poor eyesight and asked me to solder the SMT parts to his hobby computer board. Here are the SRAMs, in SOJ-36 with .050" lead spacing:

I did them with my 30W iron with a 1/8" chisel tip that covers three pins at once. I didn't use any extra flux, or a magnifier, or any solderwick, or anything special. I don't do one pin at a time either. Here's the method:
It may seem very counterintuitive, but the results in the picture speak for themselves. I don't think I've done finer pitches than .050" this way. They might require something a little different.
Someone might be afraid that the heat would damage the IC. Not so. A couple of jobs ago, in the mid-1980's, I saw transistors actually operating at over 350°C. They wouldn't last long at that temperature, but it did not instantly destroy them. The soldering method I'm describing above won't get the die (ie, the actual silicon chip inside the IC) anywhere near that hot, since at a maximum, only one row out of two will have molten solder all over it while the other row is relatively cool, and the die is not right at the pins anyway, but farther in. 60/40 tin/lead solder melts at 183°C and is completely liquid by 190°C, and again, the die won't get that hot.
A prominent member on that forum, "BigDumbDinosaur," has poor eyesight and asked me to solder the SMT parts to his hobby computer board. Here are the SRAMs, in SOJ-36 with .050" lead spacing:
I did them with my 30W iron with a 1/8" chisel tip that covers three pins at once. I didn't use any extra flux, or a magnifier, or any solderwick, or anything special. I don't do one pin at a time either. Here's the method:
- Tack two opposite corners just enough to hold the IC in place. It doesn't have to look nice yet, but you do need to get the IC straight and centered before continuing.
- Put some solder on a third corner, at the opposite end of one of the first ones you did. This will hold the IC in place in the next step.
- Now go down the other side, starting with the corner which so far got no solder. Flood that side, making one big bridge all the way down, moving the soldering iron back and forth, making sure all pads get wetted too.
- Do the same thing to the remaining side which up to now only had the corners soldered. Now you'll have both sides all bridged, with lots of extra solder.
- Go back to the first side you flooded. Hold the board vertically, with that row of pins vertical, and start with the soldering iron at the top of the row, and re-melt and move it down slowly. The extra solder will come off on the iron. You might have to shake some off before you get to the bottom of the row, if there's a threat that it will drip onto something it shouldn't. Continue down the row. Each pin should be left with the right amount of solder, just perfect, with no bridging, in spite of the large size of the tip. If I have trouble with an area, I'll put more solder on it again and repeat.
- Do the other side the same way.
It may seem very counterintuitive, but the results in the picture speak for themselves. I don't think I've done finer pitches than .050" this way. They might require something a little different.
Someone might be afraid that the heat would damage the IC. Not so. A couple of jobs ago, in the mid-1980's, I saw transistors actually operating at over 350°C. They wouldn't last long at that temperature, but it did not instantly destroy them. The soldering method I'm describing above won't get the die (ie, the actual silicon chip inside the IC) anywhere near that hot, since at a maximum, only one row out of two will have molten solder all over it while the other row is relatively cool, and the die is not right at the pins anyway, but farther in. 60/40 tin/lead solder melts at 183°C and is completely liquid by 190°C, and again, the die won't get that hot.